pulpBuild is a building model that runs in your browser: you draw the house once, and every trade works on the same model. It is meant for people preparing a home project and for tradespeople who want a quick first study.
Getting started
- Open pulpBuild. The first time you open it, a sample model appears on its own (a two-storey house already fitted out by every trade, with its site follow-up) so you can see what pulpBuild looks like; Start from scratch or Remove the example clears it in one click, and File › See the example again brings it back. As soon as you change it, it becomes your model. The left rail lists the trades (Plan, Electrical, Plumbing and heating, Structure, Thermal and energy, Quantities and estimate, Site follow-up), and the top bar holds the Plan, 3D, Section and Elevations views and the level picker.
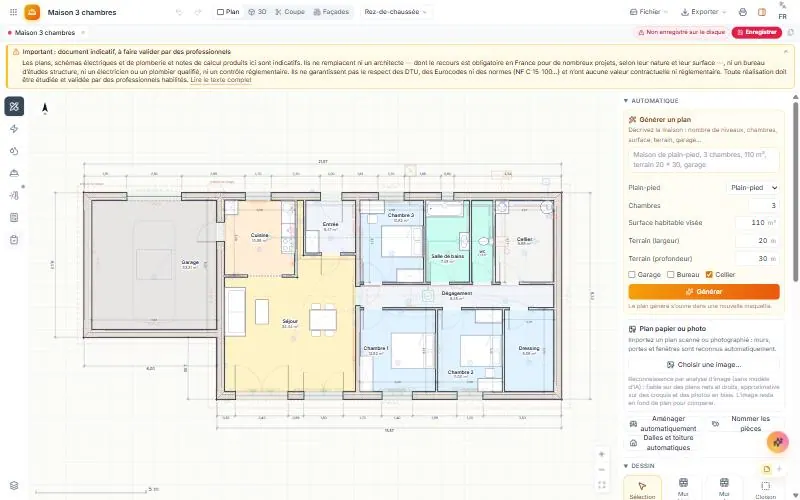
- In the Plan trade (right-hand panel), create the starting point: Generate a plan from a short description, Paper plan or photo to reuse an existing plan, or the tools in the Drawing section to draw the walls yourself.
- Click an element of the plan (wall, opening, room, roof…): its settings appear at the top of the panel (the Properties button shows or hides the panel).
- Switch trades with the rail: each one adds its own layer to the same plan and offers its automatic calculations.
- Save with File › Save (Ctrl+S) in
.pbuildformat, and print with Ctrl+P.
Common tasks
How do I draw or generate a house plan?
- Generate a plan: describe the house in one sentence (“single-storey house, 3 bedrooms, 110 m², plot 20 × 30, garage”) or fill in the fields (single or two storeys, bedrooms, target habitable area, plot, garage, study, utility room), then click Generate. The plan opens in a new model. It is a starting sketch: areas are approximate (±10%), and the usual setbacks on the plot must be checked against your local planning rules.
- Draw: pick External wall, Load-bearing wall or Partition, click the wall points, then double-click or press Enter to finish. Then place a Door, Window, French window or Passage by clicking a wall (it opens towards the pointer's side; the Properties let you flip the opening direction or rotate an element by 90°), a Stair (foot, then climbing direction) or Furniture.
- Rooms appear as soon as walls close. Name the rooms guesses their use, Furnish automatically places furniture and appliances, and Automatic slabs and roof creates the ground slab, floors and a gable roof. A roof's properties let you choose its shape (mono-pitch, gable, hip or flat), pitch, overhang and covering.
- The Areas section (habitable, “Carrez”, French floor area, footprint), Accessibility (indicative) (passage widths, 1.50 m turning circle) and Plot and climate (French department, altitude, north, climate, snow and wind zones) complete the plan. Zones suggested from the department are simplified: check them on the official maps.
- For an upper floor, use the level picker (add, rename or delete a level, set its elevation and storey height).
How do I reuse a paper plan or a photo?
In Plan › Paper plan or photo, click Choose an image… (a photo or scan saved as an image; a PDF must first be converted to an image). Walls, doors and windows are recognised automatically, and the image stays as an underlay for comparison. The scale is estimated from wall thickness: select a wall whose length you know and use Fix the scale. Results are reliable on clean, straight, black-and-white plans and approximate on sketches, photos taken at an angle or colour plans.
How do I see the house in 3D, in section and in elevation?
- 3D: Orbit to turn around the house, Walk to move at eye level, Section to cut the displayed level at 1.20 m (a “doll's house” view), See-through walls, and a Sun slider from 6 am to 8 pm for shadows. 3D needs graphics acceleration in the browser.
- Section: long section (A-A) or cross section (B-B), at the position you choose.
- Elevations: north, south, east and west.
- The Layers button (bottom of the rail) shows, hides or locks each trade, as well as furniture, dimensions (in m or cm), the plot and the underlay.
How do I plan the electrical installation?
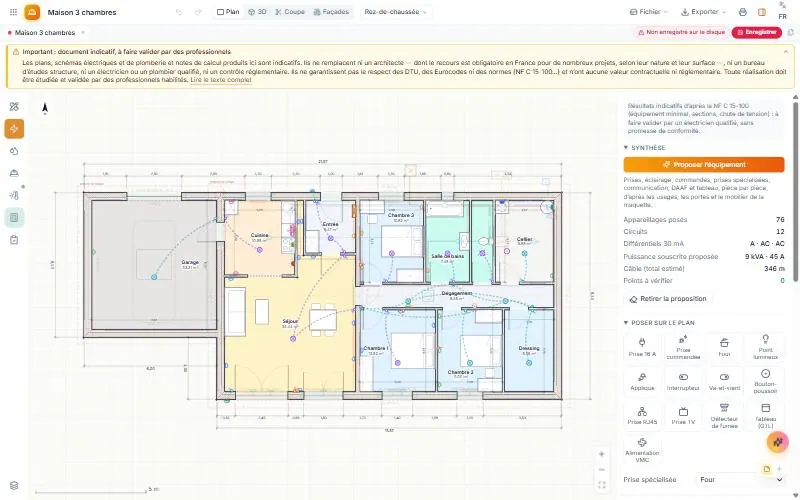
In Electrical, Propose the equipment places sockets, light points, switches, dedicated outlets (oven, hob, washing machine…), RJ45 and TV outlets, smoke detectors and the consumer unit, room by room, based on room use, doors and furniture. Anything you placed by hand is kept; Remove the proposal only removes the proposal. You can also place each device yourself (Place on the plan) and link switches to light points. The panel shows the Summary (circuits, RCDs, suggested supply rating, estimated cable length), Circuits with cable sizes and voltage drop, the Consumer unit, Points to check and the Bill of materials; the Settings let you choose, for example, the supply rating or whether to include a surge protector. Exports: single-line diagram and consumer unit as SVG, bill of materials as CSV or to pulpSheet. The built-in rules follow the French NF C 15-100 standard in a simplified way: have the installation checked by a qualified electrician.
How do I lay out plumbing and heating?
First place the sanitary fixtures (Plan trade, Furniture or Furnish automatically). In Plumbing and heating, Propose the networks routes cold water, hot water and waste pipes from those fixtures, places manifolds, water inlet, stack and inspection chamber, and proposes heat emitters room by room and ventilation. The Settings (type of distribution, pipe material, emitters, heat generator, ventilation) can be changed before you run the proposal again. You get flow rates, pipe sizes, waste pipe slopes, emitter outputs, an Isometric view (SVG export), points to check and the bill of materials (CSV or pulpSheet). Routes are simplified and pressure losses in the networks are not calculated: have it checked by a plumbing and heating engineer.
How do I get a load takedown and a structural report?
In Structure, the Model tab automatically recalculates the Load takedown from the load-bearing walls, floors and roof (snow and wind from the plot's zones), then proposes strip footings from the allowable soil pressure you enter. Propose the structure adds sized lintels and transfer beams; you can also draw a Beam or Column and click Size it (timber, steel or reinforced concrete). The Analysis model tab handles standalone cases: portal frames, Pratt or Warren trusses, continuous beams, a rectangular slab, with force diagrams and deflected shape. Assumptions sets loads, classes and combinations. The calculation report can be printed or exported as an HTML page. Bracing, seismic action, connections and masonry are not checked: a structural engineering firm and a soil survey are still needed.
How do I run a thermal calculation for the house?
In Thermal and energy, set the Assumptions (ventilation, ground floor type, thermal bridges, design temperature; the climate zone and altitude come from Plan › Plot and climate), the Walls and build-ups (layers and thicknesses, calculated U-value) and the Windows and doors (Uw). Calculate and send to heating gives room-by-room heat losses and sends them to the Plumbing and heating trade to size the emitters. If the model changes afterwards, pulpBuild prompts you to calculate again. Estimated consumption depends on the heating system, hot water and number of occupants, with an Indicative rating. The thermal report can be printed or exported as an HTML page. This is neither a regulatory French RE2020 study nor an energy performance certificate (DPE).
How do I get a take-off and a cost estimate?
Quantities and estimate works out quantities from the model on its own (masonry, insulation, slabs, roof, windows and doors, floor finishes, paint…) and adds the lines supplied by the other trades. The Estimate by trade package uses a library of indicative prices (French national average, supply and installation), which you replace in Unit prices; Estimate settings covers the regional coefficient, overheads, margin, VAT, client and company. You can exclude a package, add lines, print or save as PDF, export a .xlsx workbook, CSV or HTML page, or open the estimate directly in pulpSheet or pulpDoc. On the plan, this trade's layer colours masonry, partitions and floors and shows each room's area. The Electronic invoice option prepares, from the estimate, an electronic invoice file in the standard format: you need to fill in the seller's and buyer's details, and the full Factur-X PDF is not produced. Check the mandatory mentions with your accountant. Prices are not a quote: ask contractors for theirs.
How do I follow up the building site?
Site follow-up builds the Trade schedule from the take-off (working days, without public holidays or bad weather), with a Gantt chart and progress per package; you can set a package's duration yourself. Open in pulpPlan or Schedule .xml exports it. On site, including on a phone, add Photos (placed on the plan from their GPS position if the plot is geolocated, otherwise where you tap) and Snags (open, in progress or cleared; package suggested from the description, company, due date), pinned on the location plan. Report gathers progress, snags opened and cleared, and photos; it can be printed, exported as an HTML page or opened in pulpDoc. Your device's location is only requested if you click Device position.
How do I export or send the model?
The Export button offers the level plan (SVG or PNG image), the plan for CAD software (DXF), the BIM exchange model (IFC) and the 3D model (binary glTF). Send to passes the model to pulp3D, the quantities to pulpSheet, the estimate to pulpDoc and the schedule to pulpPlan. Each trade also has its own exports in its panel (see the table of formats).
How do I print plans with a title block?
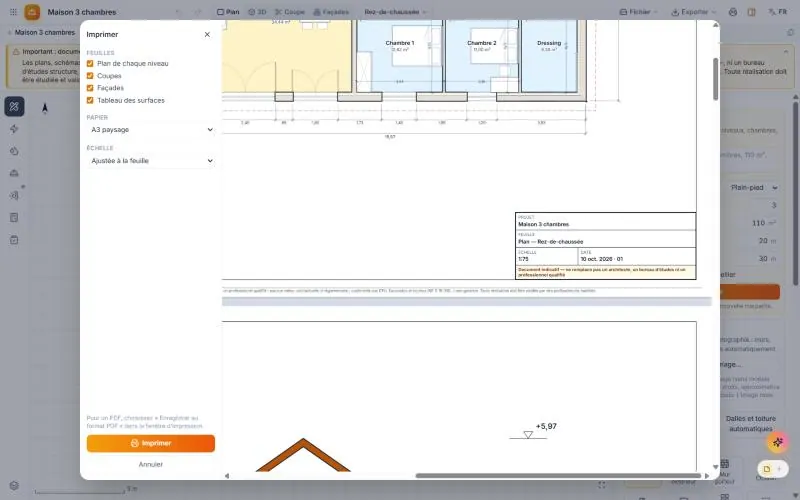
Ctrl+P or File › Print… opens the Print window: choose the sheets (plan of each level, trade plans, sections, elevations, area schedule, notes of the trades you opened), the paper (A4 or A3, portrait or landscape) and the scale (1:20 to 1:500, or fit to sheet). Every sheet has a title block (project, sheet, scale, date) and the “indicative document” notice. For a PDF, choose “Save as PDF” in the print window. See also printing.
Working together
A model can be shared with a team, or opened on a phone, with no account and no pulpSuite server. The general idea is explained in Share a file with your team or your phone; to compare it with the other ways of working: Where your data lives and how to work with others.
- Share a model: File › Save as a shared file… copies the model on screen into a new file (for example
House.pbuild), placed in a synced folder (OneDrive, Nextcloud, kDrive) or on a network drive; your original model is not changed. Your colleagues open it with File › Open a shared folder… and everyone sees the others’ changes as soon as the folder has synced. - What combines without conflict: two people who move two walls, or change two fields of the same wall, do not get in each other’s way. If they change the same field, the most recent value is kept and a notice tells you, with Keep or Use the other value.
- Undo never undoes other people’s work: only your own changes are undone.
- Site photos and floor-plan backgrounds: they travel with the file. Up to 8 MB they arrive on each device by themselves; beyond that, they show To download.
- Duplicate numbers: two snags “R12” or two reports “CR3” created offline are renumbered on merge, with a notice.
- File status: the badge in the title bar shows On this computer or Shared · N devices; a click shows who has received your changes and offers Sync now.
- My phone: File › Open on my phone… shows a QR code; scan it, check that the 6-digit code is the same on both devices, choose Read only or Can edit and the duration. The phone shows the model live from the computer and keeps nothing.
- Guest on a plan or on the project: Invite to this plan (one level) or Invite to this project sends a QR code or a link. An approval window appears on your computer: compare the code, then Refuse, Read only or Can edit. In read-only mode, changes are refused.
- Automatic backup: File › Automatic backup… keeps a full copy every day in the folder of your choice.
- Limits specific to pulpBuild: only one shared file is shown at a time; it appears as one more tab, and closing that tab takes you back to the data on the device. A very large model (thousands of elements) can slow down. Automatically recalculated parts can exist twice until two devices have seen each other; they are merged on synchronization. The shared folder needs a computer with Chrome or Edge; anyone with access to the folder sees and changes the whole file (no per-person permissions: encrypt it if needed); changes arrive at the pace of the folder’s synchronization, not in real time. For the phone and guests, the computer must stay on, with the app open.
Full details: Share a file with your team or your phone and Where your data lives and how to work with others.
Supported formats
| Format | Open | Save | Notes |
|---|---|---|---|
| pulpBuild (.pbuild) | Yes | Yes | Native format: the whole model, every trade, site photos included |
| IFC (.ifc) | Partly | Partly | Exchange with building-model software (IFC4); see the limitations below |
| DXF (.dxf) | Yes | Yes | Read by all CAD software; in millimetres, one layer per object family and per trade, displayed level only |
| DWG (.dwg) | No | No | Closed format: save the plan as DXF from your CAD software |
| Image (JPEG, PNG…) | Through Paper plan or photo | No | Plan recognised, then kept as an underlay |
| SVG and PNG | No | Yes | Plan of the displayed level; single-line diagram, consumer unit and isometric view as SVG |
| Binary glTF (.glb) | No | Yes | 3D model, also sent to pulp3D |
| No | Through printing | “Save as PDF” in the print window | |
| Excel (.xlsx) and CSV | No | Yes | Take-off and estimate; electrical and plumbing bills of materials as CSV |
| HTML | No | Yes | Estimate, calculation reports, site reports |
| MS Project XML (.xml) | No | Yes | Site schedule, read by pulpPlan |
| Electronic invoice XML (CII) | No | Yes | Electronic invoice in the standard format (EN 16931) drawn from the estimate |
Known limitations:
- DWG is not supported: no reading, no writing. Save your plan as DXF in your CAD software, then open the DXF.
- Opening IFC: levels, walls and their thickness, doors and windows, and rooms are read. Slabs, roofs, stairs, furniture and complex shapes are not; the message shown on opening says what was recognised.
- Saving IFC: levels, walls with their layers, openings, slabs, rooms, roofs, stairs, furniture and sanitary fixtures. Electrical and plumbing networks and the calculated structure are not written.
- Opening DXF: lines, polylines, arcs, circles, text and blocks; units are read from the file or guessed. Lines not recognised as walls are kept as an underlay.
- A
.dxffile opened from the suite's home screen goes to pulp3D first: to get it into pulpBuild, use File › Open… from within pulpBuild. - Every exported file carries the indicative notice.
Keyboard shortcuts
| Shortcut | Action |
|---|---|
| Ctrl+O | Open a file |
| Ctrl+S | Save |
| Ctrl+Shift+S | Save as |
| Ctrl+P | |
| Ctrl+Z | Undo |
| Ctrl+Y or Ctrl+Shift+Z | Redo |
| Enter or double-click | Finish the current wall |
| Esc | Stop the current tool, or clear the selection |
| Del or Backspace | Delete the selected element |
| Space + drag, or middle button | Pan the plan |
| Mouse wheel | Zoom |
| W A S D, Z Q S D or arrow keys | Move in Walk mode (3D) |
| Esc in Walk mode | Leave the walk |
| Up and down arrows in a number field | Increase or decrease the value |
| Ctrl+J | Open pulpAssist |
| Ctrl+Shift+O | Open documents panel |
On a Mac, Cmd replaces Ctrl. Undo and redo do not apply to the model while you are typing in a field.
AI in pulpBuild
pulpBuild's automatic features do not use artificial intelligence: plan generation, scanned-plan recognition, room naming, the package suggested for a snag and every calculation follow fixed rules. All of this runs on your device.
AI only comes in if you use pulpAssist (Ctrl+J). It can read a summary of the open model (levels, rooms, areas, results of the loaded trades), answer your questions, generate a plan from a request, rename a room, run the electrical, plumbing or structure proposals, run the thermal calculation, set the thermal equipment or the soil pressure, check a beam, list the open snags, and change a Uw value or a unit price. Each change is shown for confirmation before it is applied and can be undone with Ctrl+Z. When you use it, that summary is sent to the service configured for the assistant. The assistant's answers can be wrong: check them, like every pulpBuild result.
FAQ and troubleshooting
Can I apply for planning permission with these plans?
No. The plans are indicative sketches with no regulatory value. In France, depending on the type and floor area of the project, an architect is mandatory; in every case, have the documents drawn up and approved by professionals.
My DWG file will not open: what can I do?
DWG is a closed format and cannot be read. In your CAD software, save the plan as DXF, then open the DXF with File › Open….
My IFC file opens but some elements are missing.
pulpBuild reads only part of the IFC format (see the formats). Redraw what is missing, or use Automatic slabs and roof in the Plan trade.
3D does not appear.
The message “3D is not available on this device” means graphics acceleration is turned off or unavailable in the browser. The Plan, Section and Elevations views still work.
Where are my models stored?
By default on your device: a backup draft is kept automatically, and File › Save writes a .pbuild file to your disk. To work with others, File › Save as a shared file… copies the model into a synced folder that you choose (see Working together). Nothing is sent anywhere else unless you use pulpAssist. See your documents. pulpBuild works offline once loaded.
Do the rules apply outside France?
No. The standards (NF C 15-100, DTU, Eurocodes with the French national annexes), zones by French department, prices and VAT rates are French. Elsewhere, the results are even less usable as they stand.
My model is getting heavy.
Site photos are stored inside the model (reduced to 1,600 pixels). Print or export your site reports, then remove older photos.
A trade shows “This module ran into an error”.
The other trades keep working. Click Retry; if the error comes back, save your model and reload the page.