pulpPhoto brings layer-based photo editing, RAW development and a photo library for sorting, rating and exporting together in your browser. It is for photographers, designers and anyone who needs to open Photoshop or GIMP files without the original software.
Getting started
The first time you open pulpPhoto, a sample poster opens by itself in Edit (landscape, “Atelier Armor” text, adjustment layers) so you can see what it looks like; Start from scratch or Remove the example clears it in one click, and File › See the example again brings it back. It is not saved anywhere until you change it.
- Pick a module at the top right: Library (sort and rate), Develop (adjust RAW files), Edit (layers, selections, filters), Map, Print or Export.
- To edit an image, open it with File › Open… or drop it onto the window; New image starts from a blank page. Hold Shift while dropping a file to add it as a layer in the open image, or paste an image with Ctrl+V. A RAW file opens straight into Develop.
- For a photo collection, go to Library and click Import: memory card or drive, working folder, individual files or a Lightroom catalog.
- Try the Enhance button: it analyses the image and applies whatever helps (auto adjustments, horizon, noise, faces, colour for a black-and-white photo, upscaling a small image). Everything stays editable in the layers.
- Save with Ctrl+S. .pphoto, .psd, .psb and .xcf files are saved in place; other formats are exported from File › Export.
Common tasks
How do I remove the background from a photo?
In Edit, use Layer › Remove background… or the AI panel. The subject is cut out and the background hidden by a layer mask: nothing is erased, and you can touch up the mask with a brush. For hair, use Refine edges (AI).
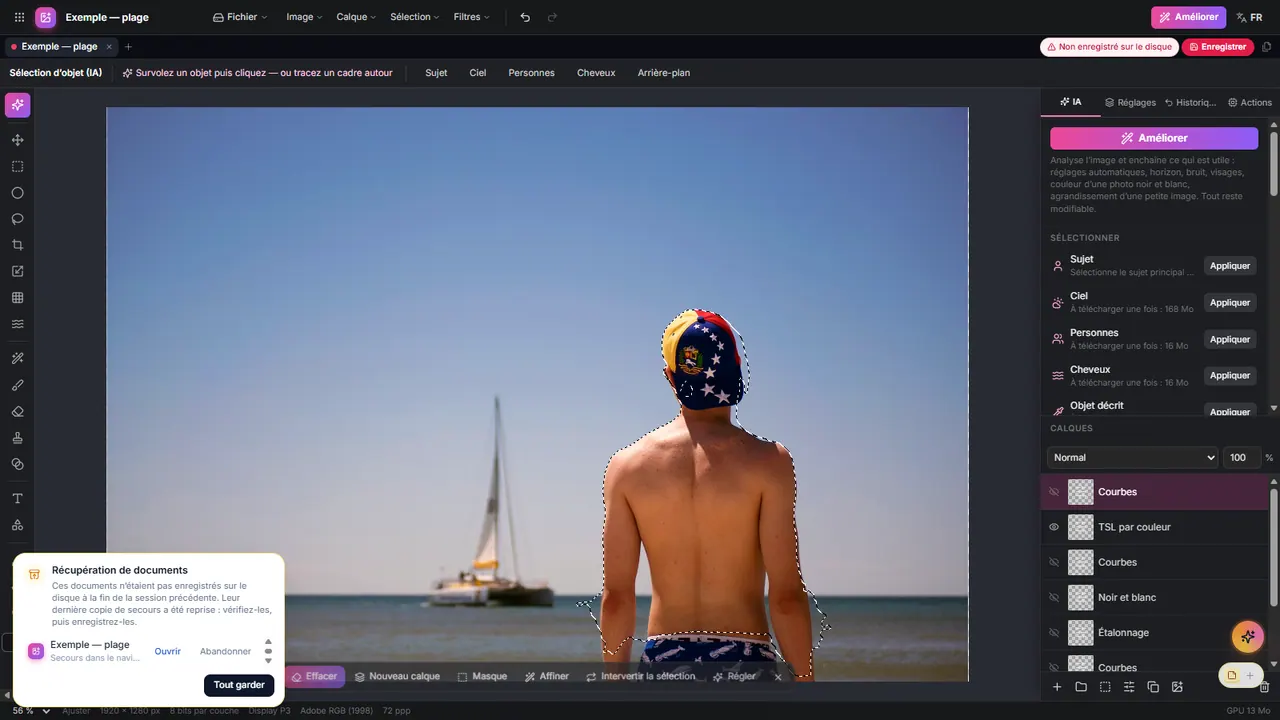
How do I erase an unwanted object or person?
Select the area (lasso, or the Object selection (AI) tool: hover, then click), then press Del or choose Erase selection: the background is rebuilt on your device. The Healing (AI) brush does the same with brush strokes.
How do I develop a RAW photo?
Open the file or, in the Library, press D. Set the profile, white balance, exposure, tone curve, colour mixer, detail, optics and geometry in the right-hand panel; Auto everything gives you a starting point. Masks (M) combine brush, gradients, colour ranges and automatic masks (subject, sky, background, people). Settings are non-destructive. Open in Edit creates a RAW smart object that you can develop again later. The left-hand panel keeps your presets and snapshots of your settings; Spot removal (Q) clears dust and blemishes.
How do I import my Lightroom catalog?
Close Lightroom, then go to Library › Import › Lightroom catalog and choose the .lrcat file. Ratings, flags, colour labels, keywords, titles, captions, develop settings, virtual copies, stacks and collections (including most smart collection rules) are brought in. Photos show as offline until you point to their root folder with Find offline files.
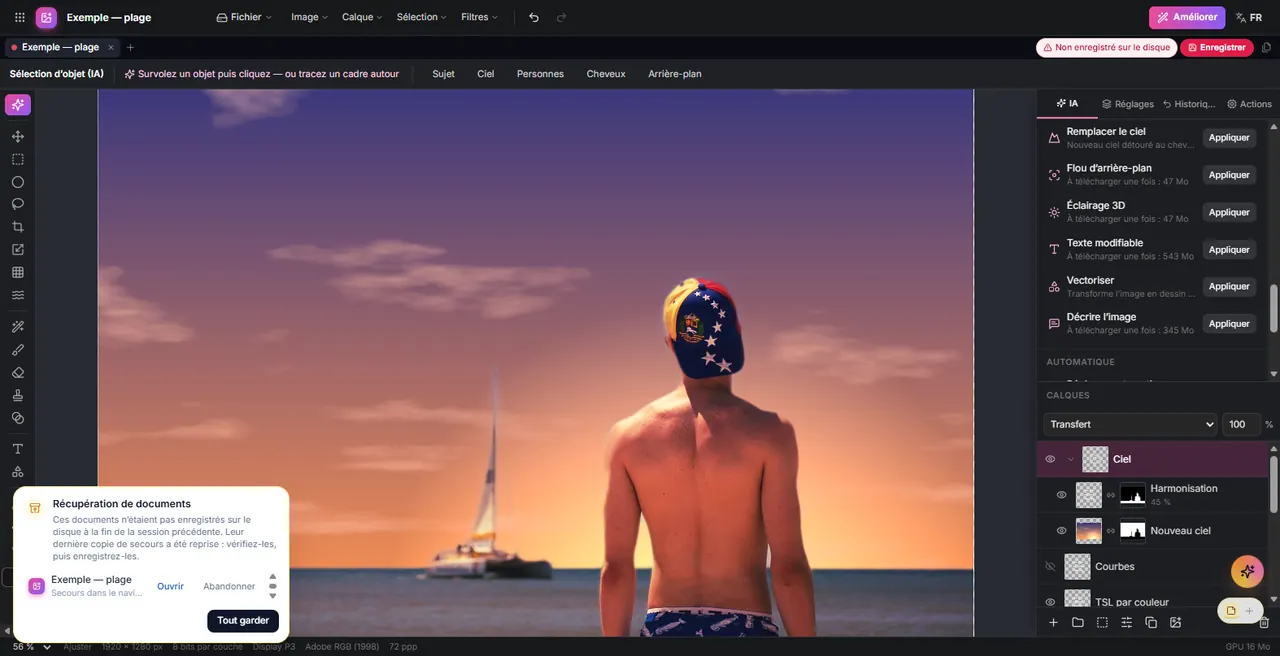
How do I replace the sky?
AI panel › Replace sky. A new synthetic sky (blue, sunset, dusk, storm) is placed under the cut-out sky, with the foreground colours harmonised, all in an editable layer group.
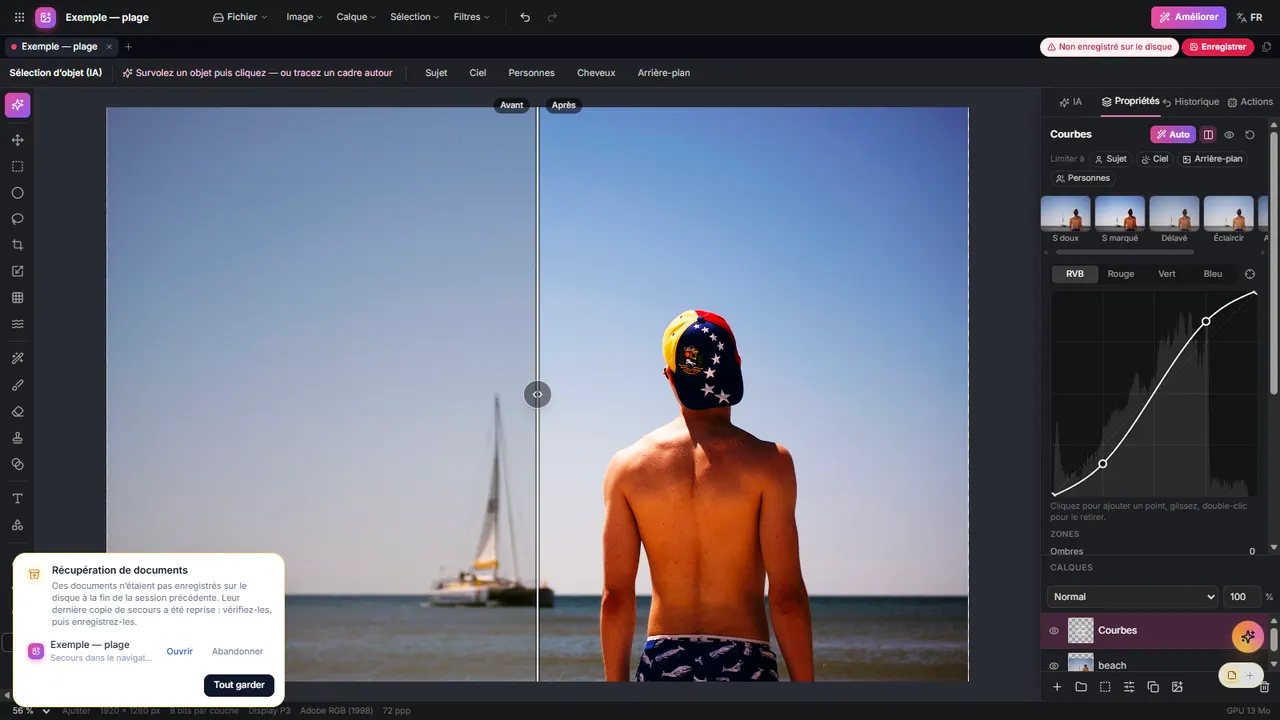
How do I adjust just one part of the image?
Add an adjustment layer (Curves, HSL, Levels…), then at the top of the panel choose Limit to Subject, Sky, Background or People: a mask is computed automatically. Hold \ to see the before state.
How do I sort, rate and find my photos?
In Library, rate from 0 to 5, mark photos as Picks (P) or rejects (X), add a colour label (6 to 9) and keywords (Ctrl+K). File them in collections, or in smart collections that fill themselves from rules (rating, keyword, camera, lens, ISO, date, location, person…). The Grid, Loupe, Compare and Survey views help you choose the best shot of a series; Stack groups near-identical shots and Virtual copy gives you a second development without duplicating the file. The search box understands plain language (“sunset on the beach with a dog”). Sort with AI scores each photo, finds bursts, duplicates and failed shots (blurry, shaken, over- or underexposed, closed eyes) and suggests keywords. Remove from catalog… does not delete files you left in place.
How do I place my photos on a map?
In the Map module, geotagged photos appear on the basemap. Load a GPX track then Locate from track places photos by capture time (adjust the Offset if the camera clock was off). Place selection at center positions photos by hand and Remove location clears the position.
How do I add text, a shape or an effect?
Use the Text (T) and Shapes (U: rectangle, ellipse, polygon, star, line) tools. The Pen (P) draws curves you can turn into a selection, an outline or text that follows the path. Layer effects (drop shadow, stroke, outer glow, colour overlay), blend modes and masks are set in the layer properties. Ctrl+T starts a free transform (scale, rotation, perspective); Warp (mesh) and Liquify reshape the image by hand. The Filters menu gathers sharpening, blurs, blur gallery, clarity, dehaze, grain, vignette, lens correction and more.
How do I send my image to another document?
File › Send to pulpSlide inserts the image on screen into the open presentation; Copy the image puts it on the clipboard so you can paste it into pulpDoc or another application. From the Library, Send to offers pulpSlide, pulpMotion and pulpDoc.
How do I process a batch of photos?
In Develop, adjust one photo then use Sync to selection, or copy and paste settings (Ctrl+Shift+C, Ctrl+Shift+V). In Edit, record an action (Actions panel) then choose Apply to a folder: results go into a “pulpPhoto” subfolder and the originals are left untouched.
How do I merge an HDR or a panorama?
In Develop, select at least two photos in the filmstrip, then HDR merge (DNG), Panorama merge (DNG) or HDR panorama (DNG): the result is a DNG you develop like any other. In Edit, the Image menu also offers layer alignment, HDR merge, panorama, focus stacking and a stack mode that removes moving objects.
How do I export for the web or for print?
One image: File › Export for web… (JPEG, WebP, AVIF or PNG, several sizes at once, side-by-side comparison at 100%). Several photos: the Export module, with Web, Social media, Print or Archive presets, renaming, watermark and a choice of metadata (for example without GPS location). The Print module makes contact sheets and soft proofs with your printer profile.
Supported formats
| Format | Open | Save | Notes |
|---|---|---|---|
| pulpPhoto (.pphoto) | Yes | Yes | Native, lossless format |
| Photoshop (.psd, .psb) | Yes | Yes | Layers, masks, editable text; written as 8-bit RGB |
| GIMP (.xcf, .xcf.gz) | Yes | Yes (.xcf) | Readable by GIMP 2.10 and 3 |
| JPEG, PNG, WebP, AVIF, TIFF, GIF, BMP | Yes | Yes | PNG and TIFF in 16-bit, TIFF in 32-bit float |
| HEIC, HEIF | Safari only | No | Depends on the browser |
| SVG | Yes | No | Opened as a smart object |
| RAW (.dng, .cr2, .cr3, .nef, .arw, .orf, .rw2, .raf, .pef, .srw, .iiq) | Yes | DNG | See the limitations below |
| Lightroom catalog (.lrcat) | Import | No | Read-only |
| XMP sidecar files | Yes | Yes | Compatible with Lightroom, Camera Raw, darktable, Capture One |
| GPX tracks, .cube tables, .icc profiles | Yes | No | Geotagging, LUTs, proofing |
Known limitations:
- Opening PSD: shape layers and vector masks become pixels; smart objects keep Photoshop's render, not the embedded file; smart filters are baked in; bevel, satin and pattern overlay are lost; “Blend If” is ignored; multi-style text is reduced to its first style. CMYK is converted to RGB approximately. A “Good to know” message lists what changed.
- Saving PSD: always 8-bit RGB, without the Display P3 profile; HSL and LUT adjustments are not written; smart objects and shapes are written as pixels.
- Saving XCF: adjustment layers and layer effects are not saved; clipping is ignored.
- RAW: not supported: Canon CR3 C-RAW, sRAW and mRAW, Nikon NEF “HE”, ARW from older Sony cameras and lossy-compressed DNG. For these files only the JPEG preview embedded by the camera can be edited, and a message tells you so. Rare RAW extensions (Kodak, Minolta, Sigma…) are not read.
- Embedded CMYK or Lab colour profiles are not converted; the working space is sRGB or Display P3.
- Batch export from the Library is in sRGB. WebP depends on the browser.
- Lightroom local masks are kept in the metadata but not applied.
Keyboard shortcuts
On a Mac, Cmd replaces Ctrl.
Edit
| Shortcut | Action |
|---|---|
| Ctrl+Z / Ctrl+Shift+Z | Undo / Redo |
| Ctrl+A / Ctrl+D / Ctrl+Shift+I | Select all / Deselect / Invert selection |
| Ctrl+J / Ctrl+E | Duplicate layer / Merge down |
| Del | Erase selection (background rebuilt) |
| Q | Quick mask |
| Ctrl+0 / Ctrl+1 | Fit to window / 100% |
| Ctrl++ / Ctrl+- | Zoom in / out |
| Ctrl+P | |
| Ctrl+R / Ctrl+; / Ctrl+' | Rulers / Guides / Grid |
| W, V, M, L, C | Object selection or magic wand, Move, Rectangle or ellipse, Lasso, Crop |
| J, B, E, S, G | Healing, Brush, Eraser, Clone stamp, Gradient |
| R, T, P, U, I, H, Z | Blur gallery, Text, Pen, Shapes, Eyedropper, Hand, Zoom |
| X / D | Swap / reset black and white colours |
| [ / ] | Smaller / larger brush |
| Space + drag | Pan around the image |
| \ (hold) | See the before state during an adjustment |
Shift plus a tool's letter cycles through the other tools in that group. In selections, Shift adds and Alt subtracts. Alt+Click sets the source for the clone stamp and healing brush.
Develop: \ before/after, J clipping, R crop, M masks, W white balance picker, Q spot removal, O show mask, Z zoom, [ ] brush size, ← → previous or next photo, Ctrl+Shift+C / Ctrl+Shift+V copy / paste settings.
Library: 0 to 5 rating, 6 to 9 red, yellow, green or blue label, P pick, X reject, U unflag, G grid, E loupe, C compare, N survey, D open in Develop, Ctrl+G stack, Ctrl+F search, Ctrl+K keywords, Ctrl+Shift+I import, Tab hide panels.
Everywhere: Ctrl+O open, Ctrl+S save, Ctrl+Shift+S save as, F1 this help.
AI in pulpPhoto
AI features run on your device: your images are not sent online. They work best with a recent graphics card and a compatible browser (recent Chrome or Edge); otherwise some of them are slower. Each one downloads its model once, after you agree (the size is shown on each card: from a few MB to about 350 MB), keeps it on the device and then works offline. Noise reduction ships with the app. Manage the space used in File › AI models on this device… and see AI models.
- Select: subject, background, sky, people, hair, skin, an object you hover or box, or an object described in a phrase in English (“the dog”).
- Retouch: erase a selection or a described object, remove the background, portrait retouching, skin smoothing, face restoration, red-eye.
- Quality: upscale ×2 or ×4, reduce noise or compression artefacts, deblur, colorize a black-and-white photo.
- Create: replace the sky, depth-based background blur and 3D lighting, make text in the image editable, vectorize, describe the image (description in English).
- Develop: denoising and ×2 upscaling of a RAW, automatic masks (subject, sky, people, background).
- Library: Sort with AI computes a technical score (sharpness, exposure, noise, closed eyes) and an aesthetic score, finds bursts and duplicates, suggests keywords and enables plain-language search (“sunset on the beach with a dog”). Grouping faces by person is off by default and only turns on when you ask.
AI features rebuild pixels (erased background, restored face, upscaled image, colours of an old photo): these are plausible interpretations, not reality. “Generative fill” from a description exists only if your administrator has connected an external image-generation service: the selected area, the mask and your description are then sent to it. Without that service the command is unavailable (use Erase selection, computed on your device). pulpPhoto does not create images from text alone.
FAQ and troubleshooting
My PSD file doesn't look exactly as it does in Photoshop.
Read the “Good to know” message shown when the file opens: it lists layers converted to pixels, effects not kept and approximated adjustments. Smart objects show the render saved by Photoshop.
My RAW photo opens at low resolution or with a warning.
That camera's compression format is not supported yet (for example C-RAW or NEF “HE”), so only the embedded preview can be edited. If your camera allows it, switch to lossless RAW or convert the file to DNG.
My iPhone HEIC photos won't open.
Only Safari can read HEIC. Elsewhere, export them as JPEG from the phone or set the camera to “Most Compatible”.
Where are my photos and settings?
With Add in place, files stay in their folders and settings are written to XMP files next to them (if the browser has write access). The catalog, previews and copies made with Copy into the library are kept on this device, in the space reserved for the browser: if you clear the browser's data, the catalog is lost (files left in place stay on the disk). Nothing is uploaded. For images you are editing, see your documents.
The app says the graphics processor is missing.
pulpPhoto needs a recent graphics card and a compatible browser (recent Chrome or Edge). Update the browser and check that hardware acceleration is turned on.
An AI feature says the model was not downloaded.
You declined or interrupted the download. Run the feature again and accept, or open AI models on this device…. If the download keeps failing, the administrator of your installation needs to make the models available.
Can I work offline?
Yes, once the app has loaded: editing, developing, the map (built-in basemap) and any AI features already downloaded work without a network.